When the American tech conglomerate Apple first intercepted the idea of iTunes Store back in the year 2000, they projected iTunes as a simple online music store where you had to pay to listen a song from the store. But with time, the company molded the idea of iTunes and changed it from an online music store to a full-fledged marketplace or more precisely a media library for all forms of digital entertainment such as music, TV shows, movies, books and applications. Also to protect the contents on iTunes Store and to stop piracy, Apple put a price tag on the each element available on the store and wrapped them with digital rights management (DRM). So that means if you want to access any content on iTunes, you have to buy it from the store.
![]()
Though Apple showed some leniency few years ago and excluded the music section from being purchased but most of the other contents, like movies, apps, books or TV shows, you still have to buy them. So, now the question what if you want to access the iTunes Store from your PC instead of the handset??Is it possible to play, download and organize your digital entertainment files from the big screen?? The answer is, yes it is possible only if you authorize your PC on iTunes with your proper Apple ID and Password. Now quite obviously a question will appear on your mind how to authorize a computer on iTunes.
Well to find that answer, you need to go through the whole article as we have discussed about how to authorize computer for iTunes. So, check out the article my friend and find all your answers from this one stop solution.
Remember the term DRM we used above. Digital Rights Management or simply DRM is designed specifically to stop the contents available on iTunes from being pirated and also restricts the usage of the digital media files used by anyone other than the person who have purchased it. As soon as you have bought the contents from the media marketplace or simply iTunes, company’s licensing facility shows you the green flag to authorize and play your purchased items on up to five computers at a time. Now, to access iTunes from your PC, you need to know how to authorize computer for iTunes. Well we have discussed the steps in details about how to authorize a computer on iTunes for both Mac and Windows, below.
But before get into the in depth procedures, let check out what authorizing PC for iTunes will facilitate you. Well, if you authorize your desktop or laptop for iTunes, then it will allow you to sync all your apps you use on your iPhone, along with that you can access your purchased movies books, music, and other contents from the iTunes Store. Also the authorization of your PC on iTunes lets you to re-download your past apps from the Apple’s App Store. The authorization enables you Home Sharing with iTunes, and also allows you some iCloud specific features like Automatic Downloads.
Another aspect we have talked about in this article is how to deauthorize your PC on iTunes. If you get bored of accessing iTunes from your desktop /laptop or if you want to replace the PC you are accessing iTunes from, then you have to deauthorize your current PC first(unless you choose to authorize that PC on the given 5 slots ). So folks, cut to the chase, let roll to the steps now. Let check out how to authorize PC on iTunes and also how to deauthorize PC on iTunes .
How to authorize a computer on iTunes(For Mac)
Authorize your Mac PC for iTunes is very easy. There are 7 easy steps to follow and we have described all the steps vividly with appropriate images and screen shots. Take a look at the steps to authorize a Mac computer for iTunes:
Step 1: First of all download and install the latest version of iTunes on your computer from the official website of iTunes, if you don’t have installed already.
Step 2: Now open iTunes.
Step 3: After that, visit the Menu Bar which is placed at the top of your computer screen.
Step 4: Now tap the Store menu and then select Authorize this Computer.

Step 5: After that a window will appear on your screen asking your Apple ID and the Password.
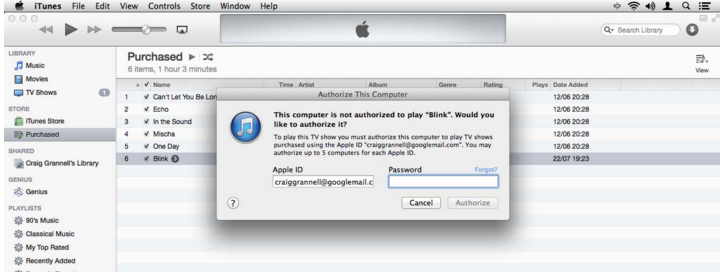
Step 6: Now fill up your credentials, and then click on the Authorize menu.
Step 7: So as soon as you submit, your computer will be authorized for iTunes and a dialogue box will appear and will tell you how many computers you have authorized for iTunes till date and how many computers you can authorize in future.

How to authorize a computer for iTunes (For Windows)
Authorize your Windows computer on iTunes is almost same as authorize Mac PCs. There are slight changes for Windows as the OS differs from each other. So better take a look guys:
Step 1: First thing first, visit the official website of the iTunes from your Windows computer.
Step 2: Now, press the Control key and the B key simultaneously on your keyboard to activate the iTunes menu bar.
Step 3: After that, select the Store menu.
Step 4: Now choose Authorize this Computer.
Step 5:Then a window will appear on your screen seeking your Apple ID and the Password, just like the authorization for the Mac process.
Step 6: Last but not the least, fill up your credentials, and then click on the Authorize menu.
So folks see how easy it is to authorize your computer on iTunes. Now as I said above, if you have reached the limit of 5 computers, you must deauthorize your PC from iTunes. So let check out the process of how to deauthorize computers from iTunes.
How to Deauthorize Computer in iTunes
Deauthorization of computers in iTunes is exactly the opposite phenomena of authorization of computers for iTunes. But the process is almost as same as the authorization techniques. Find out below the entire process of how to deauthorize your PC in iTunes:
Step 1: Visit the official website of iTunes or download and install the latest version of iTunes if you use a Mac device.
Step 2: Now open iTunes from the computer you want to deauthorize.
Step 3: After that go to the Store menu.
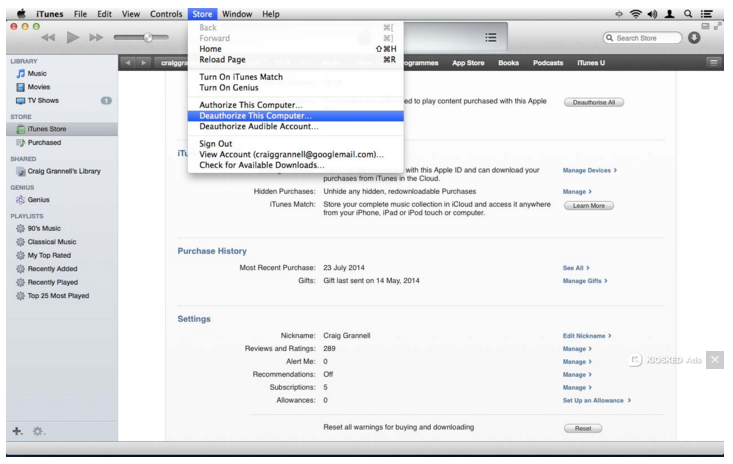
Step 4: Then select “Deauthorize This Computer” option.
Step 5: Now a window will appear on your screen asking your Apple ID and Password.
Step 6: Enter the appropriate information and click on Deauthorize.
Just keep one thing in mind before you deauthorize your computer that you don’t make any significant hardware changes prior to the deauthorization technique. Else iTunes might consider the system as a new computer, and thus it will count against your limit.
Now the above procedure guides you about how to deauthorize a single computer on iTunes. But what if you wish to deauthorize all your computers on iTunes??? There are solutions for this problem too. So check out the steps we have given below for deauthorize all the computers for iTunes:
Deauthorize All your Computers on iTunes
Step 1: First of all, visit the official website of iTunes or download and install the latest version of iTunes if you use a Mac device.
Step 2: Now click the Sign In button and then put your Apple ID and Password.

Step 3: After that enter your name and select Account info from the menu

Step 4: Then give your password again. Now the Account Information page will open.
Step 5: As soon as the Account Information screen open, scroll down to the Apple Summary Section.
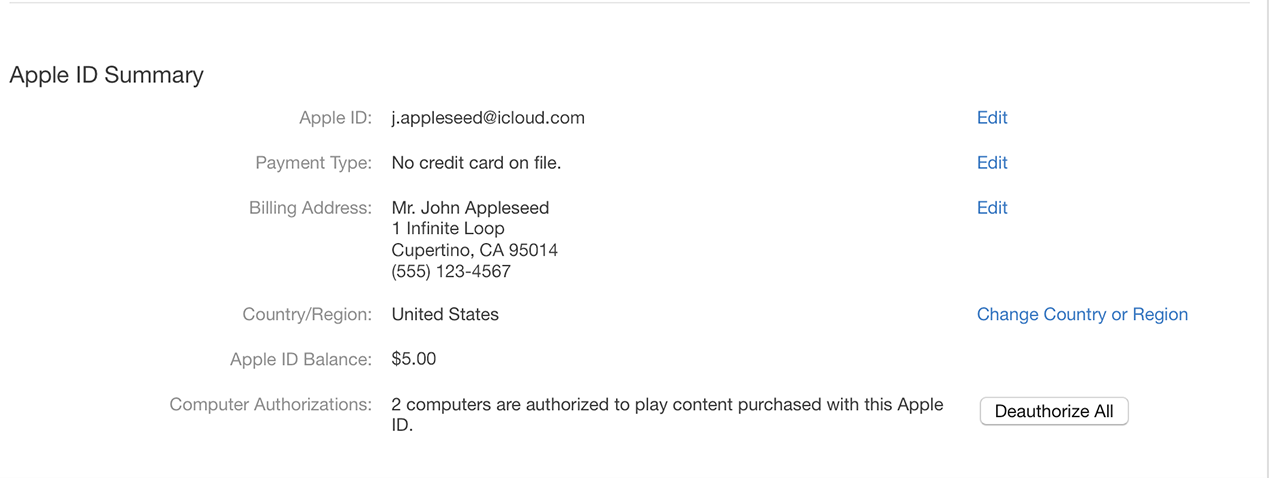
Step 6: After that visit to the right of Computer Authorizations page and click to the “Deauthorize All “menu.
Congratulations, all your computers are deauthorized now on iTunes. Just remember one thing, you can only deauthorize all your computers from iTunes only if you have two or more computers authorized for iTunes. Otherwise the Deauthorize All button will not appear on your screen. If the Deauthorize All button does not come on your screen, it means you have only computer authorized properly on iTunes.
Wrap Up
So amigos, hopefully this tutorial about how to authorize and deauthorize computers for iTunes has been a real help for you. If you have any queries about the steps or regarding the whole process, you can post your doubts on our comments section. It will be our honor to satisfy you with your queries and quench your thirst. Thank you.