Windows 10 is probably the best Windows OS ever. It took Microsoft some 30 years to incorporate new Start Menu, Edge browser, Cortana and load of great features. They even offered a free upgrade to the operating system until 29th July. With every new improvement, Microsoft promises you a better OS to work in. With the latest Windows 10 update (July 12, 2016), users have received quality improvements and security fixes. It’s worth mentioning that the OS is set to receive its biggest update, which is being called the Windows 10 Anniversary Update, on August 2. Today we will learn how to make drive partitions on Windows 10 in the easiest way possible.
Some of the key changes of the July 12 updates include: fixed issues involving DirectAccess, Disconnect Button, filed sing-in attempts, Microsoft Silverlight, Windows Phone losing user authentication certificates after the upgrade, improved reliability of Internet Explorer 11, Windows Media Player, Windows Explorer, Miracast, and Windows kernel, among other things.
How to Make Drive Partitions on Windows 10:
We receive a lot of queries regarding drive partition on the new Windows 10. Since it’s an unavoidable operation for Windows users, we’ll tell you how you can partition a hard drive in Windows 10. There are two methods; employ whatever suits you.
Using Disk Management
Note: Backup all your important data on a different hard drive. It’s a bit of a complex procedure but doesn’t require you to download and install any external software (and that’s the only perk of it). Speaking of the process, head to the ‘Windows 10 Disk Management’ interface, then go to ‘hard disk partitions’ and select ‘Shrink Volume’. Select the ‘New Simple Volume’ and then enter ‘New Simple Volume Wizard’. Next, you’ll have to specify the volume size of the drive. Following this, you’ll have to assign ‘Drive Letter or Path’ then format the partition into default file system NTFS. Hit ‘Finish’.
EaseUS Partition Master Tool (recommended)
Since the above process is too difficult to follow and time-consuming, we’ve come up with an easier and more reliable method for our readers. You’d need to download and install EaseUS Partition Master Tool which comes in both free and premium versions. We’ll tell you how we used this Partition Software on our hard drive.
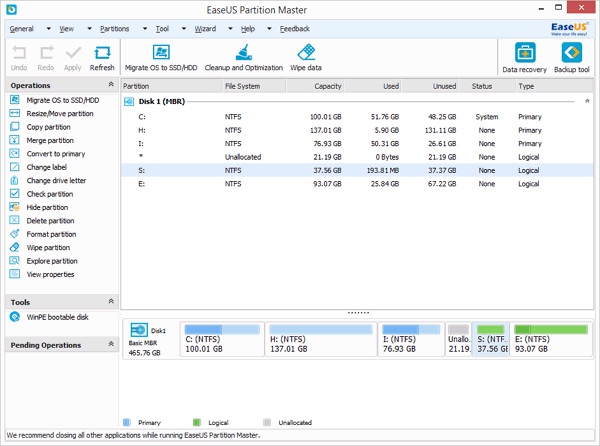
Download the EaseUS Partition Master Tool, install and launch it on your computer. Select the unallocated area on your external HD in Windows 10. Right-click and choose ‘Create Partition’ (yea, it’s that easy). The tool has a pretty clear and user-friendly interface, so if you need to do anything else, browse and select. Hit ‘Apply’ and the partitions will be created.
Since its launch, Windows 10 has been receiving smaller updates at regular intervals. We’ve seen a few such updates so far but the Anniversary Update is easily the biggest one yet. In celebrating Windows 10 availability for a year, Microsoft has released some details into the performance of the operating system so far:
- Presently the OS is running on over 350 million devices.
- Since launch, users have played with the OS for over 135 billion hours.
- There have been some 16 builds of Windows 10 and 25 PC builds since Windows 10 was released.
- Users have provided “nearly 75 million pieces of feedback and 5,000+ enhancements” for Windows 10.
Stay tuned for more information on Windows 10 Anniversary Update that releases on August 2.